
|
 2nd December 2004, 01:03 PM
|
#1 |
|
Member
Join Date: Dec 2004
Location: Witness Protection Program
Posts: 1,730
|
i know this has been discussed a million times before,but when you etch, say a sword, do you apply the acid solution once (in this case, i use radio shack's PCB etchant), and leave it on the blade for a few minutes, or do you constantly brush the solution on the blade until it's time to neutralize it? what are the different methods that are used here?

|

|

|
|
2nd December 2004, 03:15 PM
|
#2 |
|
Vikingsword Staff
Join Date: Nov 2004
Posts: 6,429
|
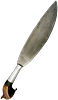
Hi Spunjer ,
When I etch for pattern with FECL I keep the solution moving constantly with a brush . Oxygenation makes the stuff work better I have found . Also if you're trying to bring up a particular area such as the midline pattern on a kris using a Q tip will keep the etchant pretty much confined to where you want it to go . That is how I enhanced the center pattern on this blade . |
|
|
|
|
2nd December 2004, 03:42 PM
|
#3 |
|
Member
Join Date: Dec 2004
Location: Witness Protection Program
Posts: 1,730
|
for how long do you leave the etchant on the blade and what ratio (FECL/water) do you use? the last time (only time, actually) i use 3:1 and the blade turned yellowish...

|
|
|
|
|
2nd December 2004, 04:22 PM
|
#4 |
|
Vikingsword Staff
Join Date: Nov 2004
Posts: 6,429
|
I don't think there's really a set ratio as different steels react in different times and ways with fecl .
I always start out with 20% fecl or less . I always mix only with distilled water . You can always boost the ratio from there . Just keep the solution moving on the blade surface . The only piece I have let stand in a solution was a contemporary Indian kanjar with a bird's eye damascus pattern , I was looking to make a topographical etch and it worked in about 30 minutes . |
|
|
|
|
2nd December 2004, 06:05 PM
|
#5 |
|
Member
Join Date: Dec 2004
Location: Minneapolis, MN, USA
Posts: 312
|
I use the brush method myself, though usually cheap tooth brushes. Always helps the solution find those little gaps, and stick better if its agitated just a bit.
Heating the blade also really helps the etch to take hold. You can use a blow dryer, or if its hot and sunny out leave it in the sun a bit. Ideally heating the solution would help too, but that is more a factor with weaker acids, like vinegar. As for concentrations, I use powdered FeCL and mix my own solution. I normally cut it to a 50/50 solution. If its too strong, then the blade builds a thin layer of oxides extremely quick eg. turns black, but I stress its a thin layer, and ironically the quick build up of oxides prevents further etching as the etchant will sit on top of the oxide layer and not go further in. Anyways, try different acids out, as different blades sometimes react better to different acids. I usually switch between lemon juice and FeCL. Lemon juice may surprise you if you havent tried it, as it is a very strong etchant, but sometimes tends for a more whitish color. I use it for initial cleaning etches, particularly if the blade is rusty (it can eat the rust without leaving large oxide deposits like FeCL). FeCL tends to be more black, and I really only use it if lemon juice doesnt give me the right color. Naval Jelly gives a grayish look. Etc... experiment. I also recommend multiple short etches (let the blade soak 2-5 minutes), followed by light oxide removal (I usually remove with 2500 grit paper lubricated with a fragrant oil). Sometimes one etch is just perfect, but if not multiple etches are safer than one real long soak as it allows you to fix things in case something goes wrong. It also allows you to adjust the coloring, darker or light as your taste. If you are really worried about damaging an inlay, or plated fittings, you can always seal them with a little clear lacquer or epoxy (crazy glue works). Easily removed with acetone. Hmm...oh yeah dont forget make sure it is absolutely grease free. I normally wash the blade with dishwashing soap, then wipe it down with Isopropyl. |
|
|
|
|
2nd December 2004, 06:30 PM
|
#6 |
|
Member
Join Date: Dec 2004
Location: Witness Protection Program
Posts: 1,730
|
thanks for the reply, federico. another confusing aspect of etching that's been bugging me is this; do i polish the blade before etching, or do i polish it later? on the last kris i acquired, this is basically what i did:
so if i want to etch it, do i remove the wax (by heat and rubbing alcohol) and etch it at this point? btw, i'm just using this blade as an example. i'm actually hesitant etching this particular sword due to its 'tiger' pattern... |
|
|
|
|
2nd December 2004, 06:40 PM
|
#7 |
|
Member
Join Date: Dec 2004
Location: Minneapolis, MN, USA
Posts: 312
|
Make sure when etching there is absolutely nothing on the blade. It should be raw steel contacting etchant. So no Ren wax.
Typically, if the blade is in good condition, you should not have to polish it at all before etching. Just clean it, degrease it, and go. However, if for some reason it need polishing (lets say the steel grain was sealed because a previous owner had used a buffer on it, or the surface is too un-even for an etch to be applied), I would start with the same grit sandpaper as whatever blemish needs to be removed (eg. if someone had ground the blade with a 220 grit stone, and hence it was too uneven to etch, I would start with 220 grit paper). However, if its just sealed, the about 400-600 grit should be coarse enough to open the pores back up. The you will need to go through the grits till you get a nice even finish. I normally stop at 2500 grit. I do not recommend polishing the blade with a polishing agent, as some contain chemicals that will stick to the steel, and mess up the etch. Also, you are trying to open the grain of the steel, polishing with an agent may close them again. Anyways, for all new blades that I get that lets say have been stored with bad owners (meaning they are in rough shape). I always clean the blade with acetone. This removes any old oil, cosmoline, dirt, etc... I also recommend washing wood and other natural materials with warm lightly soapy water, dont soak it, just lightly with a sponge. That gives a good base from which to decide what restoration work if any needs to be done. |
|
|
|
|
2nd December 2004, 07:37 PM
|
#8 |
|
Member
Join Date: Dec 2004
Location: Witness Protection Program
Posts: 1,730
|
i have couple blades coming my way and one of them might be a good experimental piece. thanks a lot for your feedback...
|
|
|
|
|
3rd December 2004, 04:25 AM
|
#9 |
|
Member
Join Date: Dec 2004
Location: Ann Arbor, MI
Posts: 5,503
|
An acquaintance of mine told me that the best way to polish swords (even Japanese!) is to use an electrically-powered contraption (lsuch as a a drill) fitted with a felt wheel and jewellers Rouge. he showed me some of the final results and they looked very good.
Does anybody have an opinion? Also, would one use an etchant on the Japanese blade to accentuate the hamon? |
|
|
|
|
3rd December 2004, 05:10 AM
|
#10 |
|
Member
Join Date: Dec 2004
Posts: 655
|
No, afaik, you don't use an etchant on japanese blades. Polishing them is a royal pain.
|
|
|
|
|
3rd December 2004, 05:21 AM
|
#11 |
|
Member
Join Date: Dec 2004
Location: Minneapolis, MN, USA
Posts: 312
|
NEVER EVER EVER USE A HIGH SPEED BUFFER ON AN ANTIQUE BLADE. If the blade is pattern welded, the buffer will seal the grain, causing not only the pattern to be hidden by the high polish, but can also prevent the blade from etching correctly. A high speed buffer will also round crisp lines. Also, the high heat generated from a high speed buffer can destroy the temper of an antique sword. Particularly for a really old sword, the hardness may not be all that high in the first place, the heat from the buffer can potentially turn a sword into decorative metal. Also heat related effects, especially the hamon in japanese swords, can thus be destroyed. Given the price and tradition of Japanese sword polishing, only trust a proper sword polisher, and do not attempt at polishing it yourself. Polishing, is not buffing, but rather a process of sharpening the sword itself, and thus there is great potential to change the lines of the sword. Realistically, I dont recommend polishing any blade because of the potential of being overly zealous and completely destroying the original lines of a piece.
|
|
|
|
|
3rd December 2004, 10:35 PM
|
#12 |
|
Member
Join Date: Dec 2004
Posts: 11
|
Do you think a very mild polishing compound like MAAS might be too much for the grain on a kris? I have a total basketcase project kris that was cracked in the middle and brazed
 and scorched and scorched  and allowed to rust in spots. I used MAAS on one side (haven't touched the other side yet) to take off active rust and scorching. and allowed to rust in spots. I used MAAS on one side (haven't touched the other side yet) to take off active rust and scorching.I have 0000 steel wool and (I think) ~2000 grit sandpaper at home. Should I go back over the blade with one of those before attempting to vinegar etch? Despite what the blade has gone through, it's an old one and I think the pattern will turn out quite nice (brass bits notwithstanding). I've taken some digital pics, but haven't had the time to upload them to anything yet. Thx. |
|
|
|
|
4th December 2004, 12:25 AM
|
#13 |
|
Member
Join Date: Dec 2004
Location: Kernersville, NC, USA
Posts: 793
|
Good thread. Excellent information.
Steve 
|
|
|
|
|
4th December 2004, 06:56 AM
|
#14 |
|
Member
Join Date: Dec 2004
Location: Minneapolis, MN, USA
Posts: 312
|
Realistically, a hand rubbed polish will probably not smear the grain in the same manner as a high-speed buffer. But then again, there is always the why take the chance factor. What I would be more worried about are all the "protective" chemical residues some polishes leave. They can be a bear to remove, and sometimes require alot more sanding just to get rid of. Notorious for ruining antiques is Brasso, screws up brass patina, and the chemicals in it cause brass to corrode in a bad color (Im sure you've probably seen the chalky white icky effect on a brasso cleaned piece of brass that has been left to sit for a while). I worry about the same thing happening on the steel. Then again, there are chances nothing would happen. I personally wouldnt bother with the potential headache.
As for etching a blade polished with a compound, you could go ahead and try. Ive never used MAAS, so I dont know what kind of gunk it coats the blade with. Degrease, and keep an eye on it. In this case I would recommend stopping the etch if it starts to look funky. Sometimes, if the grain is sealed all that is needed to re-open the pattern is etching, sometimes a little sanding helps. |
|
|
|
|
4th December 2004, 12:42 PM
|
#15 |
|
Deceased
Join Date: Dec 2004
Location: USA, DEEP SOUTH, GEORGIA, Y'all hear?
Posts: 121
|
I agree with Ferguson this is one good thread and I am learning a lot.
Question: has anyone used an ultrasonic cleaner on an old blade to get it ready for an acid etch? I have used one at work on Radioactive contaminated tools to remove the contamination. All I used was just deionized water in the tank and it cleaned up the tools just fine. Also what is MAAS? Thanks |
|
|
|
|
4th December 2004, 01:52 PM
|
#16 |
|
Member
Join Date: Dec 2004
Location: VISAYAS and MINDANAO
Posts: 169
|
MAAS is a polishing paste similar to Simichrome and Flitz. It's pretty good stuff and polishes metal really well. The only problem with those three in preparation to etching is that they all leave a protective coating on the blade. If you use MAAS, Flitz, Simichrome, et. al, make sure you clean off the blade with something like methanol, isopropyl alcohol, etc. to take off the protective coating left behind with these polishing pastes.
I've never had the opportunity to use an ultrasonic cleaner...sounds intriguing. |
|
|
|
|
5th December 2004, 06:54 AM
|
#17 |
|
Member
Join Date: Dec 2004
Posts: 11
|
Here are some before and after pics of my kris and what a few days of MAAS and some elbow grease do. It's not a true before and after becase it's the other side, but the sides were in similar condition. Actually the "after" side looked worse before I started on it.
This is the "before" side: |
|
|
|
|
5th December 2004, 06:58 AM
|
#18 |
|
Member
Join Date: Dec 2004
Posts: 11
|
And here is the "after" side. You can see not only is there the brazing that left the scorch marks, but there was another, smaller, "repair" done above that with copper rather than brass.
|
|
|
|
|
5th December 2004, 04:58 PM
|
#19 |
|
Member
Join Date: Dec 2004
Location: Witness Protection Program
Posts: 1,730
|
what happened to that kris? did you brazed it yourself???
|
|
|
|
|
6th December 2004, 12:19 AM
|
#20 | |
|
Member
Join Date: Dec 2004
Posts: 11
|
Quote:
Absolutely not. It was [afaik] a WWII bring-back I purchased off Ebay like that. I don't know when it was ... "repaired." ")  Edit: here's another pic that shows the pretty nasty condition it was/is in when I got it. Last edited by donutsrule; 6th December 2004 at 12:59 AM. |
|
|
|
|
|
7th December 2004, 05:58 PM
|
#21 |
|
Member
Join Date: Dec 2004
Location: Minneapolis, MN, USA
Posts: 312
|
There is the possibility that the braze job was done by locals. It is not unheard of, for kris and other Moro swords to be damaged and then repaired with a metal with a lower melt point, such as brass or copper. If it were an American braze job, I would expect to see a more common welding rod for steel used, rather than brass.
Anyways, one of the after effects that is visible of the before and after of using Maas is the loss of pattern. It is visible in the before pic, but by the after it becomes faint. Realistically, this happens whenever one sands a blade, but if one is not planning on re-etching it can be a loss that will never return. However, one note about etching, it can remove rust. I tend to use an initial lemon juice etch to remove any cached on rust, and get a good look at what Im dealing with before taking further action. So if you plan on etching, I would go ahead do one cleaning etch, before sanding away. You may be surprised how well it turns out after just one etch. |
|
|
|
|
7th December 2004, 06:00 PM
|
#22 |
|
Member
Join Date: Dec 2004
Posts: 11
|
I think I'm going to try the 0000 steel wool and WD-40, and maybe some 2000 grit sandpaper on the "before" side to see how it does compared to the MAAS side.
Then we'll see how a vinegar or lemon juice etch looks on this thing. Then it's on to handle restoration. Anyone know of a good place to get jute or hemp string to re-wrap over the wood handle and hold down the bacabaca holder? Edit: Federico posted the same time I did. Thanks! I guess we'll try the lemon juice etch first and then go from there. Edit edit: The little copper fix is really a neat job. The brass one is decided less so. The hamfisted grinding done to the blade after the brazing managed to not only take down the brass part, but also hit the bare blade in more than one spot.  You can see one hit as the bright patch in the scorched part of the "before" pic. I'll take some better pics of the brazing area tonight. I'd appreciate your opinion on whether this was a contemporary repair or a later US attempt. You can see one hit as the bright patch in the scorched part of the "before" pic. I'll take some better pics of the brazing area tonight. I'd appreciate your opinion on whether this was a contemporary repair or a later US attempt.
|
|
|
|
|
7th December 2004, 06:07 PM
|
#23 |
|
Member
Join Date: Dec 2004
Location: Minneapolis, MN, USA
Posts: 312
|
Not sure where youre located, but many hardware stores still carry jute twine. The twine I use, I get at Menards. There are other specialized online stores that carry more varieties, etc... But I always figure its nice to hit the local stores first for that instant gratification.

|
|
|
|
|
7th December 2004, 07:01 PM
|
#24 |
|
Member
Join Date: Dec 2004
Location: Portage, Michigan USA
Posts: 44
|
For hemp you could try a store that sells beading supplies.
It is quite popular with the younger kids for macrame and bead combinations for belts, wristbands etc. A well stocked arts and crafts like around here called "Michael's" would be a good shot too. moose |
|
|
|
|
7th December 2004, 08:07 PM
|
#25 |
|
Member
Join Date: Dec 2004
Posts: 11
|
Thanks!
There's a Michaels right on my way home from work.
|
|
|
|
|
8th December 2004, 06:18 PM
|
#26 |
|
Member
Join Date: Dec 2004
Location: Portage, Michigan USA
Posts: 44
|
any luck?
moose |
|
|
|
|
9th December 2004, 06:20 PM
|
#27 | |
|
Member
Join Date: Dec 2004
Posts: 11
|
Quote:
Hahah!! I mentioned to my wife that I was going to stop by Michaels (she LOVES the place) and now, instead of a quick stop, it's turned into a family shopping trip scheduled for this weekend.
|
|
|
|
|
|
9th December 2004, 07:29 PM
|
#28 |
|
Member
Join Date: Dec 2004
Location: Portage, Michigan USA
Posts: 44
|
Oh No! Now that's gonna cost you. If they don't have it you can get it off the web. There's been some real nice stuff coming out of Hungary. Yes, there is a difference in twines, strings and ropes. Especially if your going to use it to make something load bearing like a bowstring. If I was gonna rewrap a handle in hemp I'd start with a quality manufactured string or twist something up myself. Around here it's dogbane or swampnettle. But you should use what they had available to them. moose |
|
|
|
|
11th December 2004, 03:14 PM
|
#29 |
|
Member
Join Date: Dec 2004
Posts: 655
|
Interesting. My favorite cleaning method NEVER-DULL, followed by oil. Should it be ok to use it before FeCl etching ?
|
|
|
|
 |
|
|


 Linear Mode

