
|
 23rd March 2005, 04:00 AM
|
#1 |
|
Member
Join Date: Mar 2005
Posts: 9
|
How do you submit a photo?
|

|

|
|
23rd March 2005, 04:42 AM
|
#2 |
|
Member
Join Date: Dec 2004
Location: Houston, TX, USA
Posts: 1,254
|
I know nothing of photography or computers, but if you check the second "sticky" thread down on this forum, the one about forum rules/guidelines/etc. you'll find some directions that may help you.
|
|
|
|
|
23rd March 2005, 06:30 AM
|
#3 |
|
Member
Join Date: Mar 2005
Posts: 9
|
 I need to show and get feedback of very usual sword I have collected...but I dont know how to submit photo to this forum...help pls... I need to show and get feedback of very usual sword I have collected...but I dont know how to submit photo to this forum...help pls...
|
|
|
|
|
23rd March 2005, 07:40 AM
|
#4 | |
|
Member
Join Date: Nov 2004
Location: USA
Posts: 1,725
|
Welcome to the forum.
As Tom indicated in your other thread, try reading the thread stuck to the top of the forum that says: "PLEASE READ".  Quote:
|
|
|
|
|
|
23rd March 2005, 10:16 AM
|
#5 | |
|
Member
Join Date: Mar 2005
Location: USA Georgia
Posts: 1,599
|
Quote:
|
|
|
|
|
|
23rd March 2005, 04:12 PM
|
#6 | |
|
Member
Join Date: Dec 2004
Posts: 987
|
Quote:
In the event you cannot scan it, I do not know if paper photos are accepted (you would have to mail it to a moderator to be scanned and posted). |
|
|
|
|
|
23rd March 2005, 05:02 PM
|
#7 |
|
Member
Join Date: Dec 2004
Location: Europe
Posts: 2,713
|
Would it be possible to show some screens on the forum, to make sure that newcomers understand the whole thing?
Jens |
|
|
|
|
23rd March 2005, 05:13 PM
|
#8 | |
|
Vikingsword Staff
Join Date: Nov 2004
Posts: 6,262
|
Quote:
|
|
|
|
|
|
23rd March 2005, 06:00 PM
|
#9 |
|
Member
Join Date: Dec 2004
Location: Poland, Krakow
Posts: 418
|
Here comes the cavalry with help
 1. Make a picture. To be honest it's not so easy, and probably it's the hardest of the steps. 2. If you have digital camera there's no problem to download a picture on your local hard disc, if it's a paper, scan it. 3. Make sure your picture's resolution isn't bigger then 800x600 pixels, and the size isn't bigger then 200kb (1/5 of MB)  . If it is, especially after downloading it from digital camera or after scanning, you need to resize it. Make a copy of a picture, if you don't want to loose or destroy it. Then use any graphic program: photoshop, ACDSee, or free one like Gimp or InfraView. Every one should have somewhere the option that let you resize the picture (sometimes it's called "picture size", "resize", etc.). If you can't do it, send an email to forum staff, for example: to Andrew or Rick, with description. . If it is, especially after downloading it from digital camera or after scanning, you need to resize it. Make a copy of a picture, if you don't want to loose or destroy it. Then use any graphic program: photoshop, ACDSee, or free one like Gimp or InfraView. Every one should have somewhere the option that let you resize the picture (sometimes it's called "picture size", "resize", etc.). If you can't do it, send an email to forum staff, for example: to Andrew or Rick, with description.4. If you have a picture resized, just start the thread or quote someone, or just post reply - you can do it already . Then you'll see a window: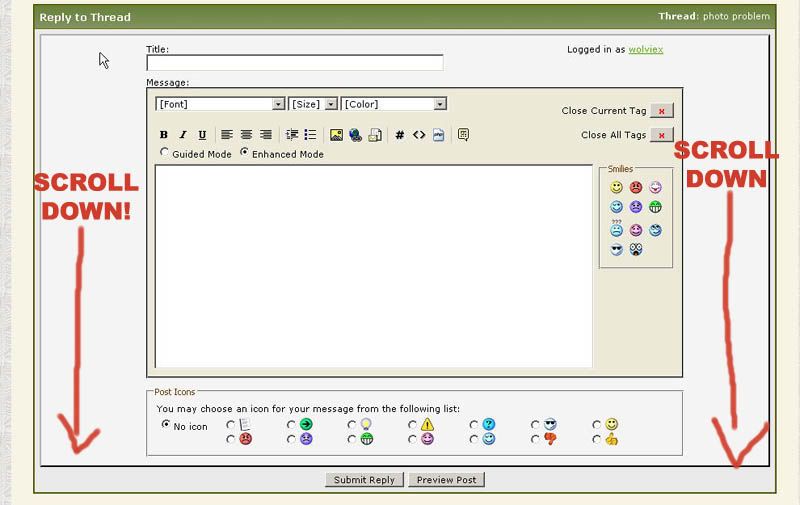 5. Scroll down and choose Manage Attachments: 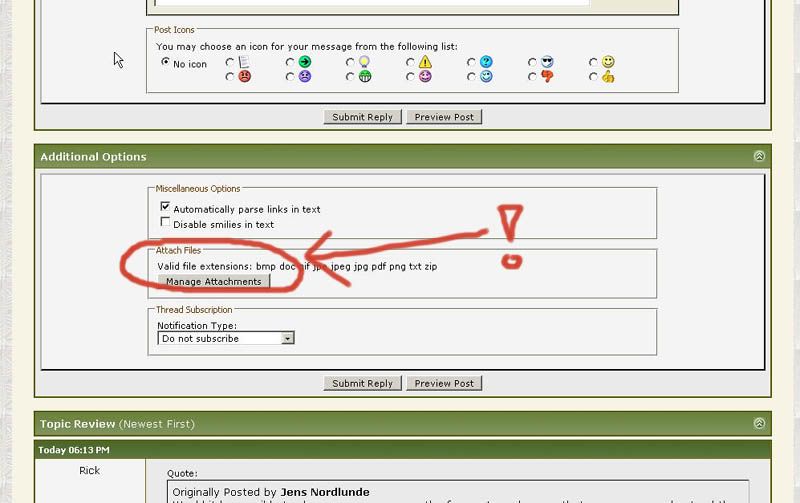 6. You'll see next window, where you can browse your hard disc, find a picture (s) and choose UPLOAD (My windows is in Polish version, so instead "Przegladaj" you will see "Browse" probably ):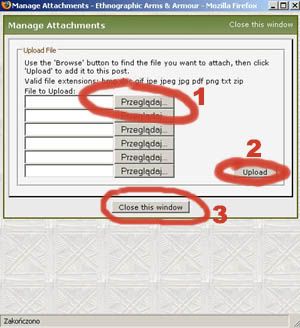 7. When the picture is accepted, you'll see listed it below the browse windows, if it's not (because of size, or wrong extension) you'll see information above the browse windows. 8. Close the window and Submit Reply. Have a fun! Regards! |
|
|
|
|
23rd March 2005, 06:37 PM
|
#10 |
|
Vikingsword Staff
Join Date: Dec 2004
Location: The Aussie Bush
Posts: 4,029
|
Wolviex:
That's a neat thing you did with the screen shots. You also managed to do something I have not been able to achieve on this forum, and that is to intersperse text and graphics. How did you do that? Ian. |
|
|
|
|
23rd March 2005, 06:50 PM
|
#11 |
|
Member
Join Date: Nov 2004
Location: USA
Posts: 1,725
|
Ian, those are screen captures (not sure exactly how that's done, however) that Wolviex hosted on Photobucket.
You'll need to host and link your photos if you want to insert text, as the forum software will attach photos to the bottom of a post by default. |
|
|
|
|
23rd March 2005, 07:05 PM
|
#12 |
|
Vikingsword Staff
Join Date: Dec 2004
Location: The Aussie Bush
Posts: 4,029
|
I just figured that out. Sometimes I'm a little slower than others!!!
Ian. |
|
|
|
|
23rd March 2005, 07:21 PM
|
#13 | |
|
Member
Join Date: Dec 2004
Posts: 987
|
Quote:
Great tutorial, Wolviex! |
|
|
|
|
|
23rd March 2005, 07:33 PM
|
#14 | |
|
Member
Join Date: Dec 2004
Location: Athens Greece
Posts: 479
|
Quote:
Dimensions are not the only matter. We use different resolution for printed material and screen. Here we are interest about screen resolution so we use 72 dpi or 96 dpi. (DPI or LPI is dots per inch or pixels per inch). A normal scanner or digital camera takes the picture in more than 150 DPI so we have to reduce this also to have a size under 200mb for uploading. In InfanView and other image editors dimensions and resolution are in the same window, so when you resize check DPI or LPI to be 96. Finally there is another way to change image size. Use save as .jpg and in final window lower the quality to 80%. Of course lower quality is the last option if you want a clear picture. To see if a picture is under 200mb we right click on the icon of it and we choose properties. |
|
|
|
|
|
23rd March 2005, 10:13 PM
|
#15 |
|
Member
Join Date: Mar 2005
Posts: 9
|
thx for info....ill be sending photo shortly...
|
|
|
|
|
24th March 2005, 08:36 AM
|
#16 |
|
Member
Join Date: Feb 2005
Location: Clearwater, Florida
Posts: 371
|
VERY well done tutorial, Wolviex.
drzzzzz, if you still have problems, just e-mail the photos to me or one of the other members that you may know and I'm sure it can be popped in in a jiffy. There was a time when I did it on a regular basis, to the point that I was worried about Rick and Ed taking out a contract on me! **grin** They, of course, were always proper gentlemen, but still felt like a real pain in the posterior. Mike |
|
|
|
|
24th March 2005, 01:42 PM
|
#17 |
|
Member
Join Date: Feb 2005
Location: Chicago area
Posts: 327
|
Can someone explain the clarity of some of the pics on this forum. They seem to have more resolution than would be allowed. Is there a rule of thumb as to the MP of the digital camera, for instance, would a 6MP be to large & need to be reduced?
|
|
|
|
|
24th March 2005, 02:51 PM
|
#18 | |
|
Member
Join Date: Dec 2004
Location: Athens Greece
Posts: 479
|
Quote:
MP is not the only important thing when you take digital photos. You need also good lenses to capture a good image. I usually take pictures for internet use in just 3MP. When you take photos of edged weapons you need a camera with good macro capabilities for the close ups. A tripod is essential so you can use low speed and depth of field. Daylight is better than artificial. Finally you have to be careful when you resize, change resolution or save a jpg file because every time you do that the quality drops down. For every step of editing a picture it is better to start from the original photo. |
|
|
|
|
|
24th March 2005, 03:31 PM
|
#19 |
|
Vikingsword Staff
Join Date: Nov 2004
Posts: 6,262
|
I find Photoshop's 'unsharp mask' feature to be very helpful in reducing large jpeg files while retaining good detail .
|
|
|
|
 |
|
|


 Linear Mode

